Saturday, May 12, 2012

The End.....


Hallway Bath
We have come to the end of my blogging for this site. I started this blog - with the hope - that sharing my experiences and research, will help someone make the right decisions when engaged in their own renovation. There is some good information here, so please enjoy!

The renovation is complete and we have fared pretty well through out this renovation. The only issue that remains unresolved, is the issue with American Classic Kitchens, which I wrote about recently. 


We were, and remain, happy with the contractors; including the electrician and plumbers. They all worked hard, showed 'attention to detail' and remained professional at all times. To that end, and the end of  the blog, I would like to share the final results of  our project, by showing you the before and after pictures. In addition, I will hi-lite of what has been done, along with before and after pictures, that will hopefully give some ideas for your own renovation. 

Let us start with the hallway bathroom. This is clearly a room that gets a lot attention by your visitors, and more importantly a potential buyer, should you decide to flip the apartment. 


What you see above and below, are pictures of the original bathroom - from the 1930’s - when the building was first erected. In this apartment, both the hall and master bathrooms were identical; with the exception the master is a  bit smaller.
Original, Built-in Scale
One of the most interesting pieces of the original bathroom, was the scale, that is shown, it was built into the wall with the same 'stainless steel' look we see today. We thought it was really cool, and considered having an updated version of a scale installed in the same fashion; but I dislike scales – they are cruel to me. I am sure at least some of you know what I mean? Needless to say, there is no scale in the new hall bathroom - or in the entire apartment, for that matter.

Hall Bath After
The new bathroom has a marble floor - and stone tiles with black, white and grey streaking. The bathtub is the original to the apartment: cast iron from the 1930"s, which has been re-glazed. 


New plumbing and electric was installed throughout the apartment, including the bathrooms and kitchen. 


For both bathrooms we also have installed recessed lighting. The light over the medicine cabinet is a vintage Art Deco light that was given to us by a dear friend.

Hallway Before
Next, let’s have a look at the hallway. The hallway is quite large; 25 feet long and between 4 and 6 feet wide - depending on where you are in the 25 foot length. The hallway was quite dark, so to compensate we added several recessed lights, requiring the ceiling to be dropped 8 inches, but the loss of height was well worth it. 


In addition, the walls and ceiling were skim coated to eliminate all the cracks, and the walls were painted white.  I would like to point out an interesting relic. If you look at the wall of the 'Hallway Before' picture, there is a phone on the wall, which is the original intercom system that communicated with the concierge and doorman in the 1930's. With the advent of modern technology, the intercom system is no longer functioning.

Hall After
Now on to the kitchen. As disappointed as I am in American Classic Kitchens, I do like my kitchen. I still have some unfinished cabinetry issues, but you have that link. This is where most of the work was done, in regards to demolition and reconstruction, a lot of work, particularly for the plumber. 


The original galley kitchen was long and narrow and would not afford much space at all, specifically given the new size of standard appliances and cabinets. 
Kitchen Before
The wall between the kitchen and living room was quite thick, about 10 inches, so removing the wall and opening the kitchen to the living room would not only allow for the desperately needed depth, and provide an open and airy feel to the entire living room and kitchen, so down came the wall. 
Living Room (Wall was removed)
The kitchen cabinets are Nordic white and manufactured by Wood-Mode. Since we opened the wall between the living room and kitchen we decided to have door covers on the refrigerator and dishwasher, rather than have the stainless steel exposed.


Kitchen After
The original kitchen floor was tile with cement sub-flooring. We had this removed and had the wood floor extended into the kitchen. This was a big job, because the cement had to be broken down so the hall floor would flow evenly into the kitchen. 


The stove was moved to the far wall. Recessed lights were installed in the ceiling; as well as lights in the upper cabinets - with the glass fronts; and under the cabinet lighting for over the countertops. 


For the counter tops themselves, we bought a slab of marble from a quarry, and the contractor coordinated with a marble cutter to template and install the counters and kitchen window sill. 

Living Room After
For the living room we skim coated all the walls and ceiling and painted the walls off-white. There are a total of five windows in the living room and kitchen, so the space is very bright and airy. The air conditioners were originally in the windows of each room and we had the removed and placed through the wall under a window in the living room and one in each bedroom. This was a trick process that required bridges to be constructed on the street so the holes could be made and sleeves inserted. Luckily for me, there was bridging up already because the building was have facade work done on the upper floors. This certainly saved us some money. Next up are the bedrooms. 

Guest Bedroom Before
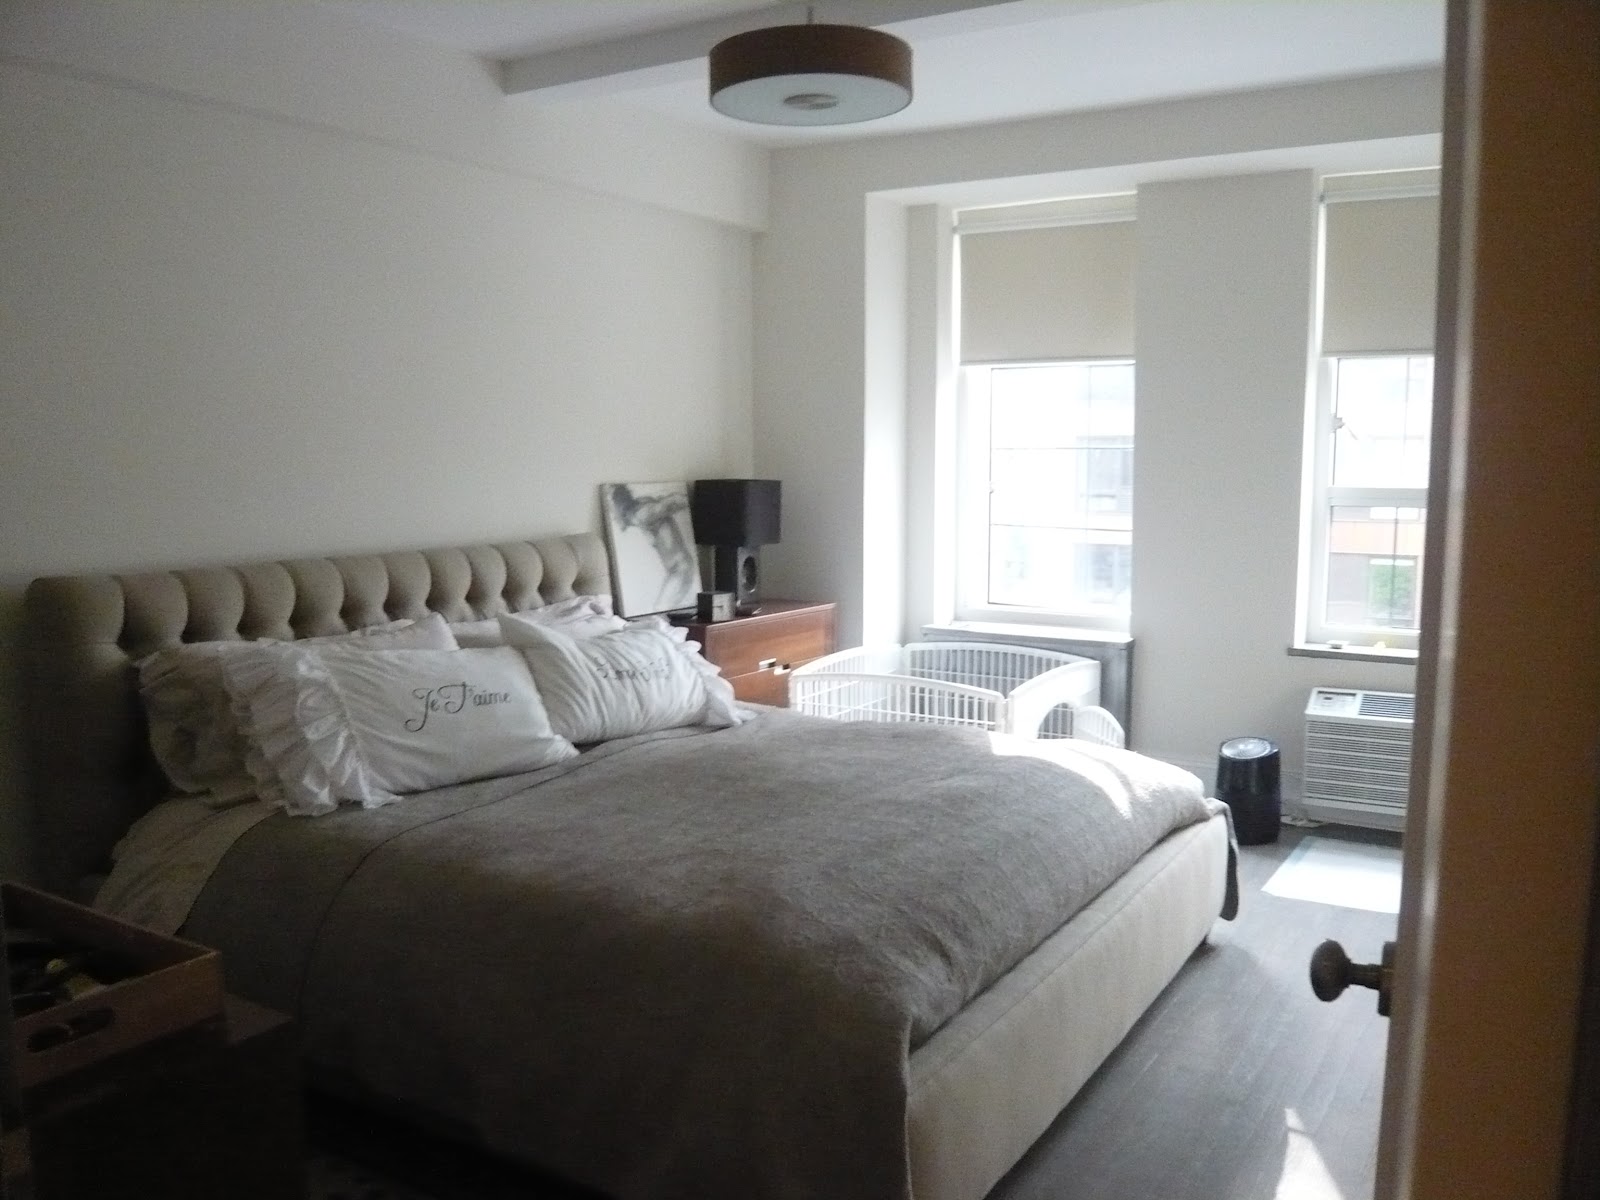
Master Bedroom After
The apartment has two bedrooms that are about the same size; however, the master bedroom has a private en-suite bathroom. The bedrooms were in pretty good shape, including the walls and floors. We had the air conditioners placed through the walls, as mentioned above, skim coated the walls and ceilings, had new electric wiring installed - in addition to cables cut into the walls to avoid having unsightly cables and cable boxes exposed. The floors were sanded and refinished with a grey stain throughout the apartment. The biggest transformation for the master bedroom was in the en-suite bathroom. 


Master Bath After
The original bathroom was the mirror image of the hall bath, the original 1930's tile and fixtures. For the master bathroom we decided to remove the old bathtub and install a walk-in shower with glass wall enclosure. We installed eight by three inch subway tiles, marble tile floor and modern sink and medicine cabinet. The shower body has a rain soaking shower head, as well as a hand held shower wand. As an aside, the reason we did not put the walk in shower in the hallway bath was because of resale. Someone buying a two bedroom apartment may have a child and require a bath tub for them. It should also be noted that bathrooms and kitchens add a great deal of value to apartment, so we did not skimp on materials.

Last -  but certainly not least is the doorway. You were probably wondering why I chose the original condition of the door for the main blog site. Well, it was the beginning, entering into the apartment by that door. It started our vision, to create an apartment that was in keeping with the traditional prewar style, but with a modern flair. The door was a bit battered, had too many holes for locks that were not needed, but under the layers of paint would be a beautiful silver patina door that was the original to the apartment. 


Hall After


We replaced all the doors in the apartment, seven to be exact, but we saved the front door because of it's true beauty, scars and all. I guess no different than the experience of dealing with an extensive renovation. I assure you, you come out with some scars too.

 But in the end we love our new home, so all the effort was worth it in - The End!!


Tuesday, May 8, 2012

Almost There


While we have had a number of issues with the renovation of the apartment, I can say that progress has been generally good and the work done in a timely manner. We have stayed within budget and have been able add a few extra touches, such as dimmer switches for all the lights, as well as built in closets.

All the walls are up and skim coating of the walls and ceilings are well under way.  If you are not sure what skim coating is, have a look a technique attached below.

Skim coating techniques:


Before Skim Coating
Skim Coating


The floors has been prepared and we are choosing the stain color. All preparation, planning and monitoring has worked so far and by my next post I should be in a position to show the completed product with before and after photo’s, so stay tuned! 

Renovation Update - Progress Management


Laying out the tiles
During your renovation, it is a good idea to ensure that you are monitoring progress and discussing any issues as they arise with your contractor. This will ensure that you stay on target as best you can and address issues immediately. As an example, some of the challenges I came across were tile placement. We purchased tiles that had a marble like look and required laying the tiles out before being installed to ensure the flow of light and dark tiles we evenly placed. 

Completed Project
We had asked the contractor if he was comfortable ensuring that the tiles would be distributed evenly, and we provided him a photo of the lay out we had from the tile shop where we saw the display. The contractor said they understood and would lay the tiles out accordingly. Needless to say, when the first wall went up they had used all darker tiles and there was an abundance of light tiles for the remainder of the bathroom. 

When this was brought to the contractor’s attention, he said, "it is a matter of opinion”. We had the contractor take down the tiles and laid out the tiles on our own in the middle of the living room floor for them to copy in the bathroom. We was forced to buy additional tiles but the contractor agreed to eat the cost of taking down and reinstalling as we originally suggested. Had we not been on top of the renovation the job may have been completed and we would have had a much more difficult time getting the contractor to fix the problem, and we would have had to buy a lot more tiles.

So the lesson remains, if you are not living in the space, make sure that you visit the site daily – or at least arrange with the contractor to view work that could be left to interpretation.

Saturday, May 5, 2012

Interview - Angie Hicks, Founder of Angie's List


Since I have been blogging about renovations and how to choose a contractor, I thought it would make sense to interview Angie Hicks, founder of Angie’s List, a service that provides recommendations for quality service providers, as well as doctors.

Angie’s List is now a publically traded company closing at $14.07 a share on Friday, 4 May.

I was able to get Angie to answer a few questions for me and here is what she had to say to the questions she allowed:

Q: Angie’s list was established in 1995. What made you decide to start this business?
A: I was asked to start the business by Bill Oesterle, my co-founder. He’d recently moved to the Columbus, Ohio area and was having trouble finding reliable contractors to help with his home renovation. He had used a similar service in Indianapolis and thought they could help fill the need for other homeowners in the same situation.

Q:There are other service providers such as Service Magic in this space. What differentiates you?
A: Angie’s List approaches the idea of connecting homeowners and contractors/service professionals from the mindset of the consumer. We collect information about actual experiences to give consumers an idea of how each company performs. Our business model begins with a subscription fee from the consumer. We do not allow anonymous reports and we encourage companies to monitor and respond (free of charge) to the reports.  Once a company is reviewed by a consumer and starts to accumulate reports, other opportunities arise. If the company can first earn and then retain high grades, it is eligible to advertise its services. We also offer group coupons from those who are eligible to advertise with us. The consumer grades are key to eligibility, and if the grades fall, the advertising is pulled.  We also offer complaint resolution and a monthly magazine.

Q: What is the most rewarding aspect, for you, in providing this service to the public?  
A: Helping consumers find reliable information BEFORE they hire is the best reward.

Q: When did Angie’s list go public?
A: November 16, 2011.

Q: How many and employees do you currently have?
A: About 900

Q: What are your current revenue’s?
A: Please refer to our S1 statement filed with the SEC

Q: What plans are there for expansion?
A: We are now offering referrals for Doctors and planning to go into other areas of referral, but I can not disclose that at this time. 

It was very generous of Angie to take her time and respond to my questions. She has an impressive website and if you are considering a renovation I would highly recommend that you look into the service provided by Angie's List. All the best in your endeavors.